This day was beastly hard. It is hard to do, and it was really
hard to figure out a good method for.
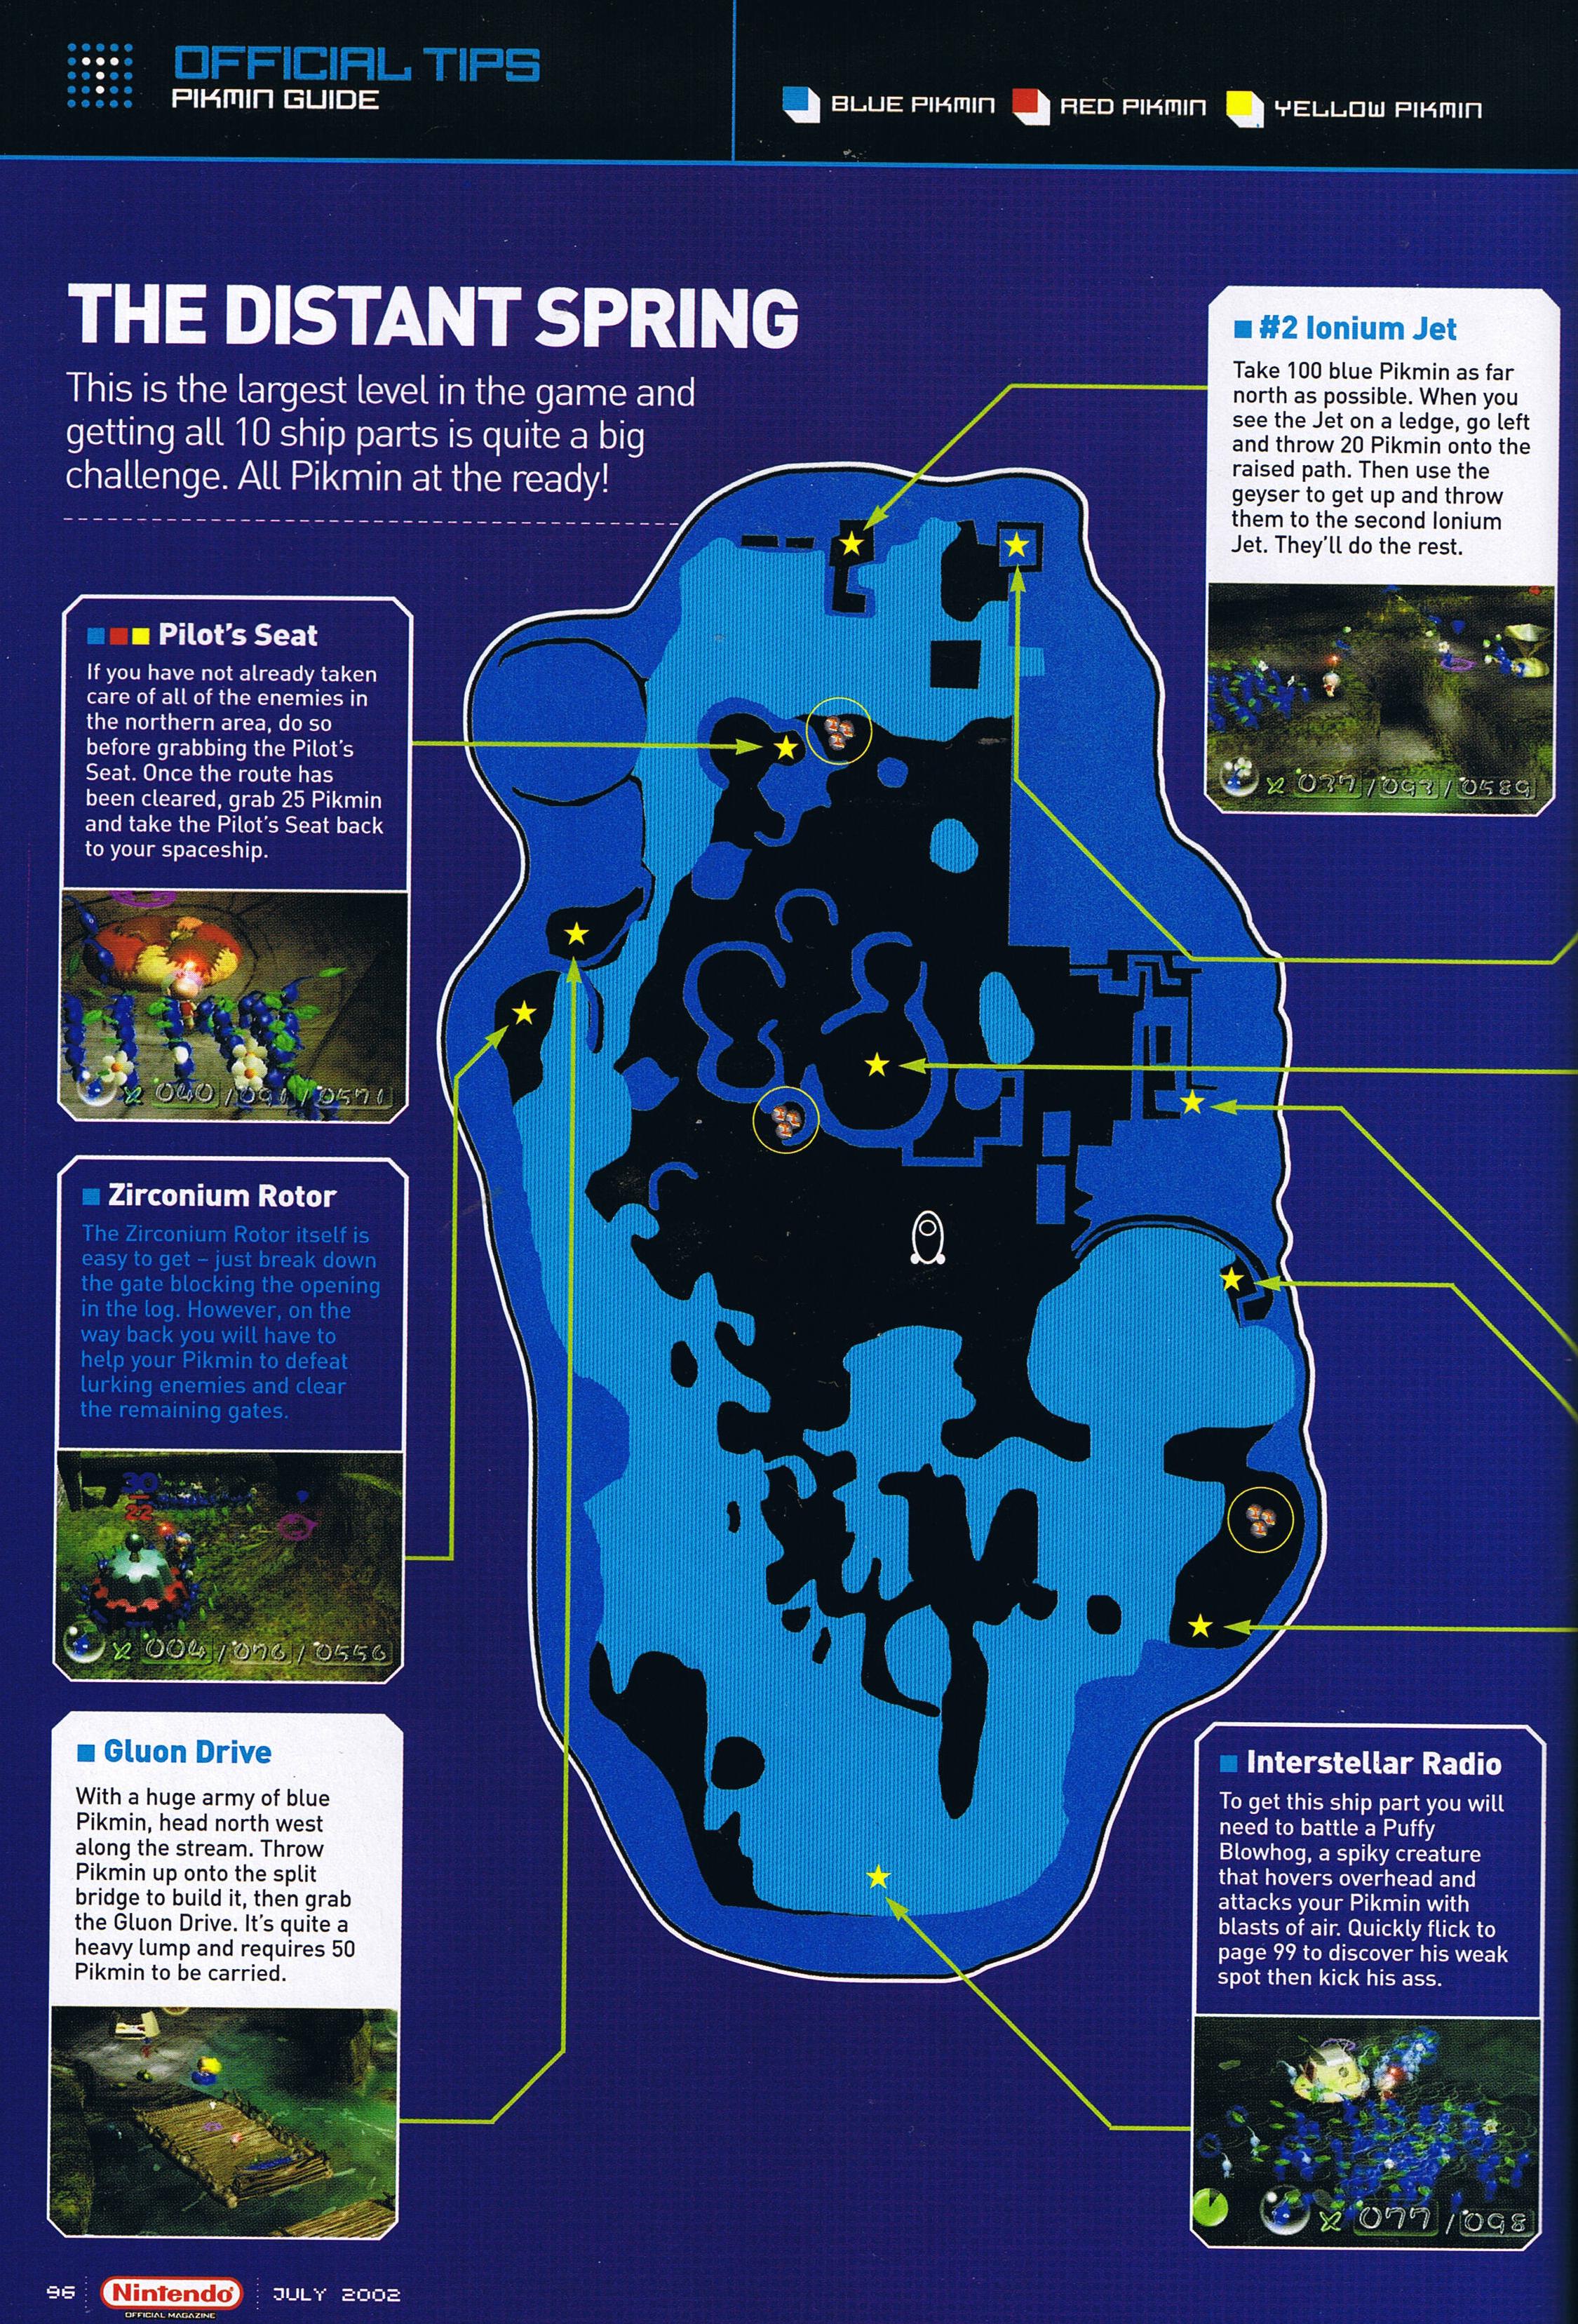
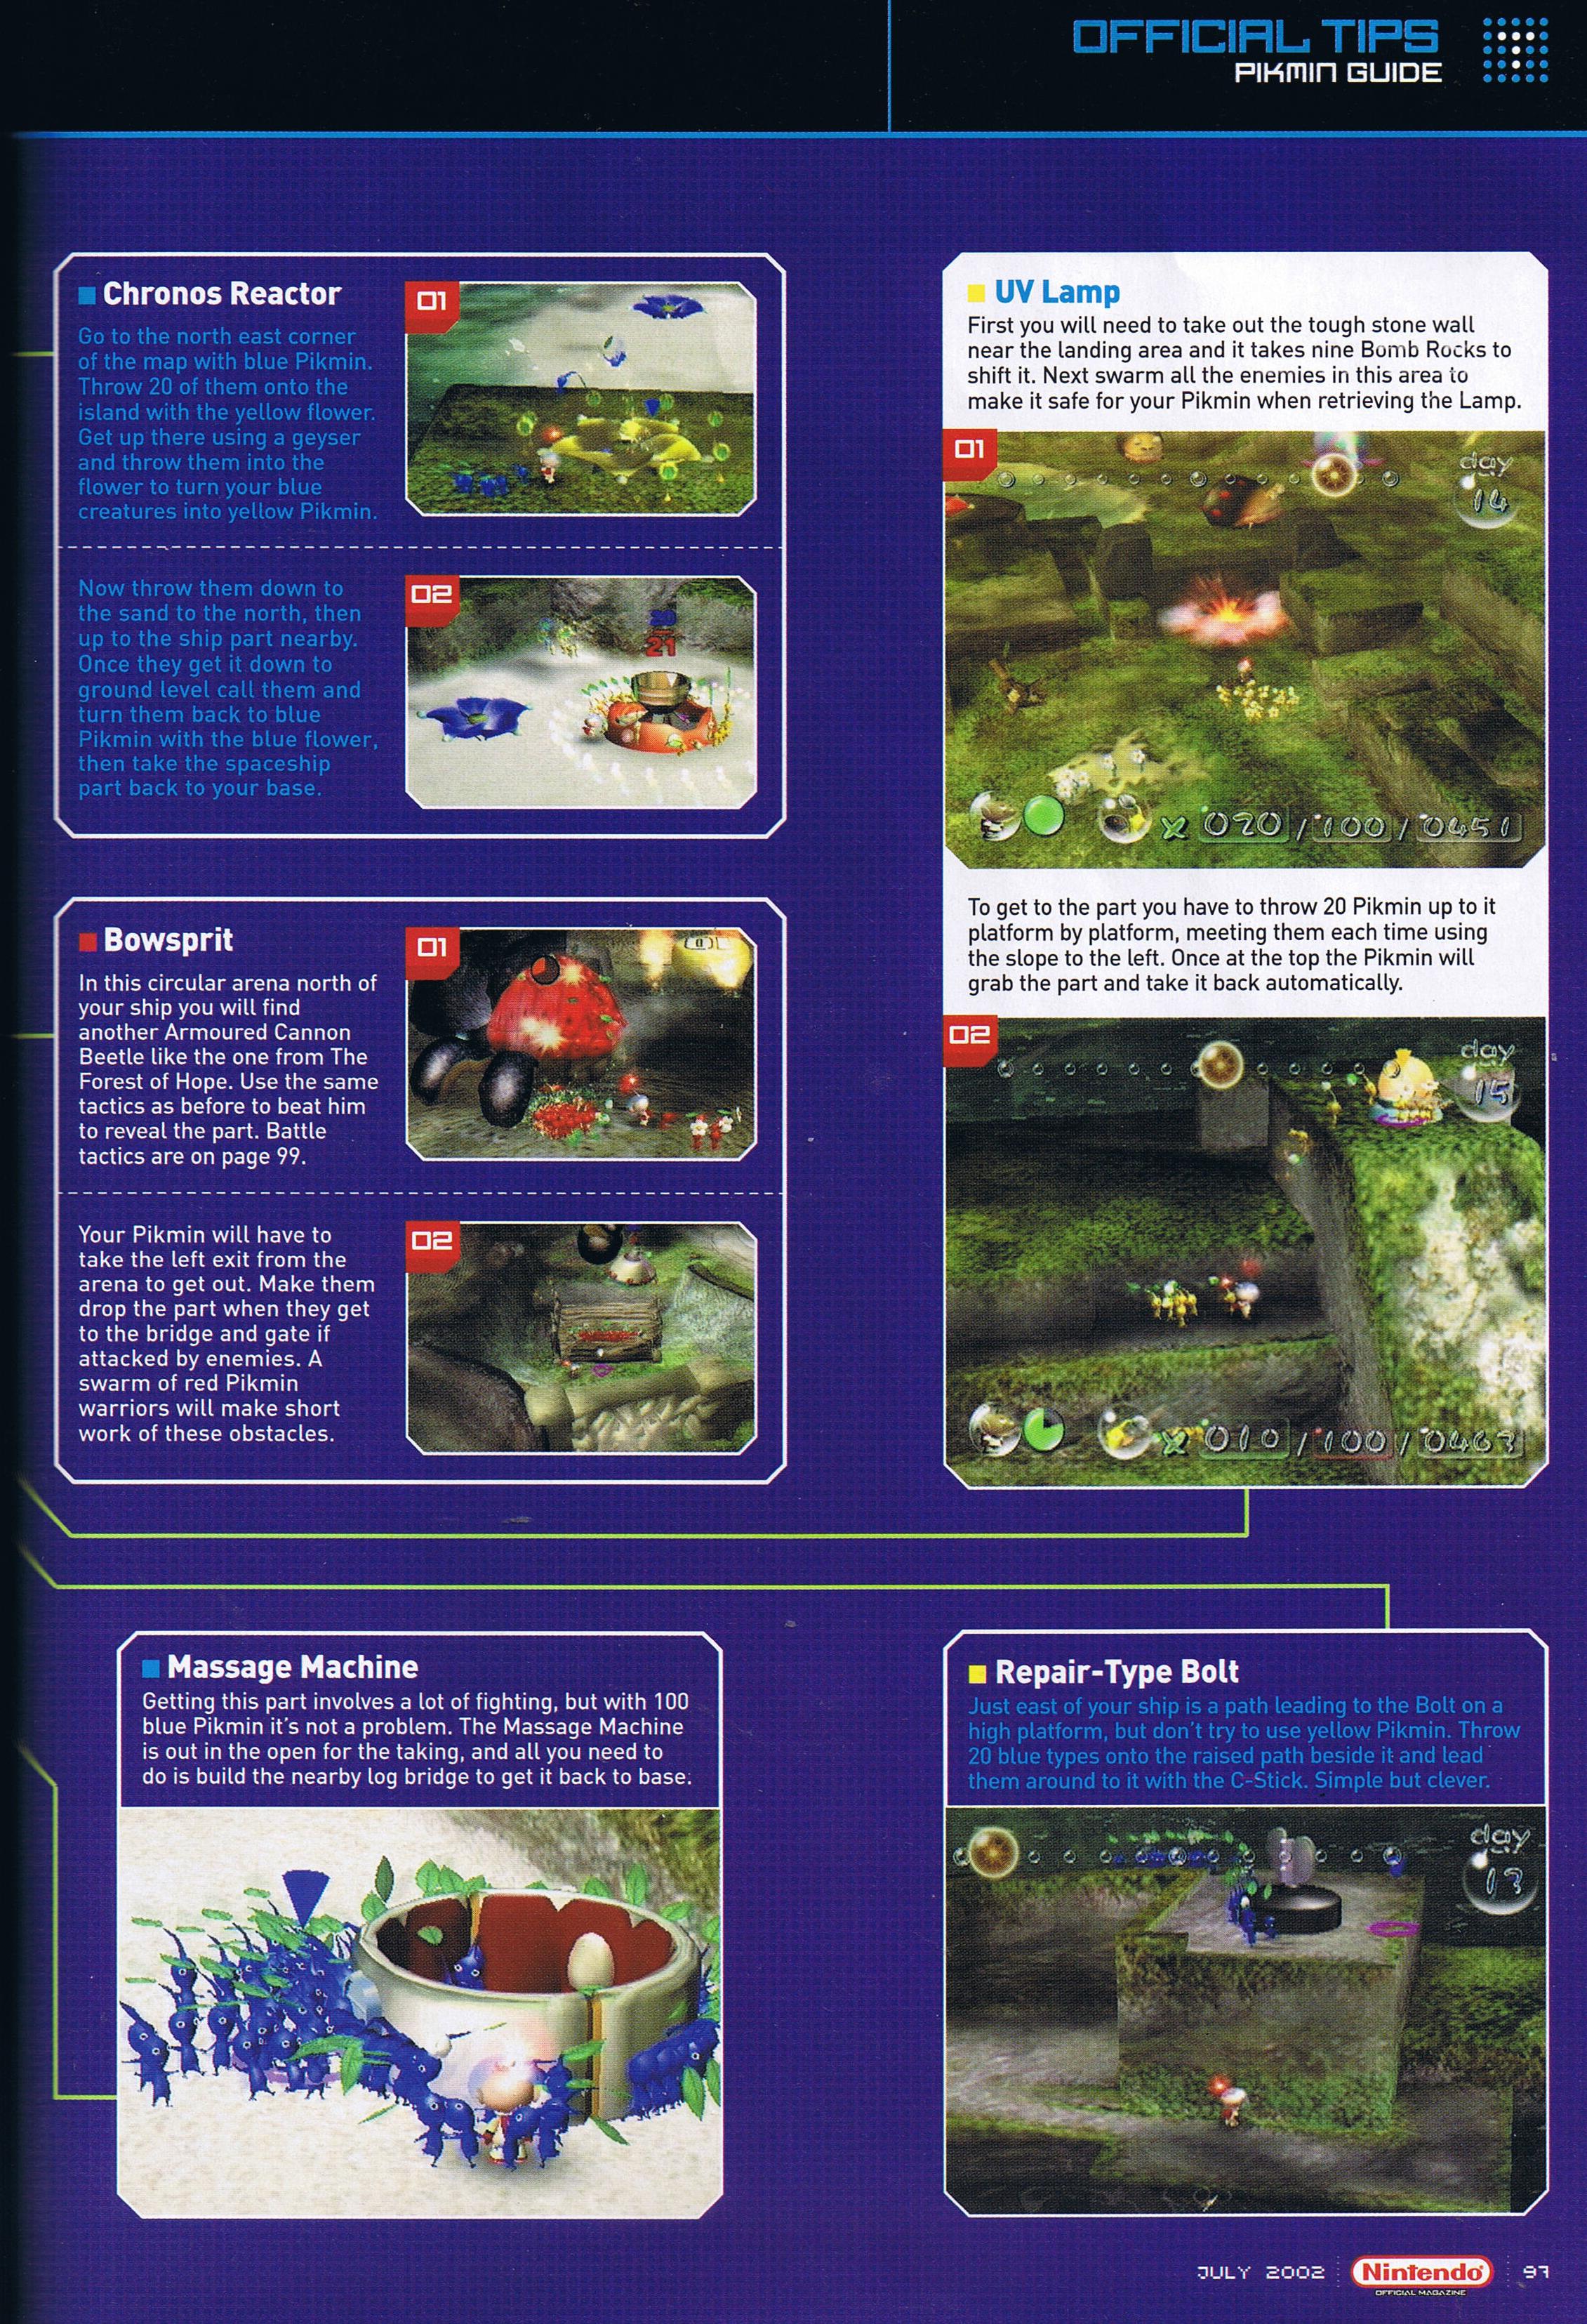
I get the Interstellar Radio, Massage Machine, Repair-Type Bolt,
Gluon Drive and the UV Lamp.
Here's a video showing how it's done:
Footage of all of the days together is available here.
An annotated map of this location is here
and here.
The most I've bred on this day is 60 Pikmin.
Challenges
There are a lot of dangerous monsters on this level. The trick do doing it safely
is to find clever ways of avoiding most of them. For those that cannot be
avoided I try to kill them at the beginning of the day, so that an unfortunate
death only wastes a couple of minutes, instead of fifteen.
At any point in this day a Swooping Snitchbug
may pop up. In most cases I will
kill the Swooping Snitchbug
as soon as possible, but occasionally it is better
to ignore him. The Snitchbug is a wildcard that makes this level
inherently unpredictable.
Difficulty
This day was the hardest day to do for the first time. The tricks I learned
make it a lot easier, but the Snitchbugs and other complications make
this probably the trickiest day in the Perfect Pikmin challenge. I recently spent
a couple of hours and dozens of retries trying to do this day again, and I hadn't
yet made it. 90-95% of the time I lose a few Pikmin in the first three minutes,
killing the Spotty Bulbears (that's why I do them first). On the rare times that I
do that perfectly I have to race to finish the rest without running out of time.
Minor technique improvements since then have improved my success percentage - but it's
still very low.
What to do
Take out one hundred blue Pikmin. On this watery world they are the
safest kind, and I do not find that they are much less capable
than their red brethren. If you prepared well on previous days then at
least ninety of them should be flowers, so you shouldn't need to waste
time on nectar.
Immediately - without waiting for all the blue Pikmin to get out -
chase after and
kill the Puffy Blowhog.
This is a great time saver, since it takes quite a while for a hundred Pikmin to come
out and you might as well be doing something.
The main trick is to keep Puffy away from the Spotty Bulbears, so
stay between him and them. If you're feeling ambitious, chase Puffy towards the Onions so
that when you kill him you can quickly convert his pellets into more Pikmin.
Now you have to
kill the two Spotty Bulbears.
This cannot be done
with 100% safety, and it has to be done quickly. If it doesn't work,
then at least you haven't wasted much time. The trick is to hit them from behind. This
is hard with the second Bulbear, but try to steer your Pikmin as much behind as possible
while approaching from the side.
Your Pikmin have probably had a few petals knocked off by all the fighting,
but it doesn't matter. Don't waste time on nectar, you'll need that time
later.
Head past your ship and towards the far end of the bridge that lies near
the massage machine. As you come onto that sandbar you will awake three
Shearwigs. Kill all three of them. If you leave one alive, it will slowly
eat your bridge building Pikmin. If you're feeling greedy, put Pikmin on them for later eating.
It only takes on Pikmin to carry them back, and they're worth four. Yum - nutritious.
If one of the Shearwig bodies is heading back immediately and going near the Wollywogs
then you probably need to toss a second Pikmin on it, to keep it moving fast enough to be
safe.
Take seventy to eighty Pikmin (you must have at least seventy), leaving the
rest to build the bridge. Head towards the bulb that holds the Smokey Progg and leave
your Pikmin near there.
Olimar should go on and
kill one of the Water Dumples
and then go back for the Pikmin and kill the other two.
Now you need to kill the Puffy Blowhog.
It is very important to kill him in the right place. If he is too far to the right
(as you approach him initially) then you may have to fight extra Water Dumples,
and your Pikmin will take the Interstellar Radio back along the wrong route, forcing
encounters with still more Water Dumples. Force him to the left, and kill him there.
There is a large area where it is safe to kill him, so don't worry about it too much.
Put forty Pikmin on carrying back the Interstellar Radio. They will carry
it past two Yellow Wollywogs, but they will be
going so fast that the Yellow Wollywogs can't hurt them. Put the other thirty to
forty on the Massage Machine. It may take a while for it to get back because the bridge is
still being built. That's okay. Note that you don't kill the Spotty Bulbear
near the massage machine. That would just be silly. When the bridge does
get finished, the massage machine will automatically resume moving, picking
up a few of the bridge workers to speed things along.
While Olimar waits for the Radio to return he should go past the
Yellow Wollywogs
in the water and then lure the Yellow Wollywog on land
(on the Massage Machine's path back to the ship) off to the left two jumps.
This helps avoid any unfortunate accidents with the massage machine or any
stragglers. This is very important.
When the Interstellar Radio gets back to the ship, take the forty Pikmin
off to get the Repair Type Bolt. Throw them up on to the ledge, then walk
them around to the part. Note that if you stand too close to the ledge you
will not be able to throw onto it effectively. If you have trouble getting them to pick up the
bolt, try dismissing them when they are near it and they should grab it.
While they are carrying the Bolt back, the Massage Machine should be
returning also. Pick up any stray Pikmin from the bridge or anywhere else,
and go back to the Onions.
Put about fourteen blues back in the Onion, then take the other 86 off
to the double bridges. Drop them off to the left of the near half of the
bridge, then lead the nearby Yellow Wollywog
away from the bridges, beyond the wall. Two hops away seems to be sufficient for him to
leave your Pikmin alone.
Now put about twenty Pikmin on the first half of the bridge, and take the
others to the other half. Approach it on the left - to make sure the Yellow Wollywog
doesn't cause trouble. I find that an overhead view makes it easier to
deal with the Shearwigs.
Once all three are dead, put the rest of your blues on building
the bridge. Again, you can assign one Pikmin to carry each of the Shearwigs
back, for snacking later.
Go get fourteen yellows (enough to get your numbers up to one hundred,
so that any food that gets taken back to the Onions won't require you to
start picking flowers) and go get the bomb rocks that are stored near
where the Massage Machine was. You should get eight to ten bomb
rocks.
Bring those bomb rocks back and use them to blow up the black wall
near the Onions. If you only have eight bomb rocks you will not quite
succeed. It is important to do this immediately, to minimize the risk
should a Swooping Snitchbug come along. Having a perfect day ruined by
having a Snitch steal a Pikmin carrying a vital bomb rock is quite distressing.
Go back towards the double bridges, which should be completed now. Drop off
your yellows and get the blues carrying back the part. If you're greedy, hold
about fifteen of the blues back and use them to carry the nearby Bulbear body
back to the Onions. Then get the four bomb
rocks stored nearby and throw them at the nearby white wall - saving one for the
wall near the Onions if necessary. You will not knock down the white
wall, but it is critical that you do at least two bomb rocks of damage
to it, and five is better.
When you finish bomb rocking, head back to the Onions. Put all of your
blues away, to keep them safe from Snitchbugs. You will not be needing them
anymore today.
From this point on you don't have enough Pikmin to be able to fend
off an attack by a
Swooping Snitchbug.
If one shows up you can try dodging it, or you can try plucking the flowers that
it plants. Once your tasks are done and you have plucked any flowers planted
by Snitchbugs you can always Go to Sunset to avoid future run-ins with him
in the final seconds.
Take your yellows through the knocked down wall near the Onions (or any
nearby passages that are equivalent)
and walk past the first Bulbear and the Blowhog to the
ramp near the second Bulbear. Kill no one. It is too dangerous and time
consuming. Avoid the nectar grass (go to the left of it), and throw
the yellows onto the ramp. This is the fastest and most reliable way of
getting them all on it.
Walk up the ramp, whistle for your yellow Pikmin and walk them along
the walkway.
When you get to the first dead end, walk down it and then throw your
Pikmin up at the end. This is the easiest way of getting them around
difficult corners.
You may need to repeat that process for the second dead end, or you
may find you can guide them more easily out of the second dead end.
Use your C-stick to keep the yellows on the ledge while you throw
ten or eleven up to the UV Lamp.
Take the remaining three of four to get bomb rocks down towards the
water near the Pilots Seat. You need at least two bomb rocks.
Take the bomb rocks and knock down the wall that blocks the exit
to the Armored Cannot Beetle's lair.
If you get that wall knocked down, and if the part gets back, and if
at the end of the day all Pikmin are either back at the ship or with you
(doesn't count if they're pulling up nectar grass - watch for that)
then you are done for the day.
Congratulations.
The final stage of this day - knocking down the last wall - is surprisingly
dangerous. Many times I have had a snitchbug steal my Pikmin - and kill them -
at the end of an otherwise perfect day. Or my Pikmin have wandered into nectar with
half a second remaining - thus putting themselves in the 'left-behind' category.
Therefore, I have investigated the possibility of postponing this part of the day
to day 8. I'm sure it works, but I haven't actually tried it. The idea would be to
take a couple of yellows along (easy enough) with the blues when heading out for
the Zirconium Rotor. When you put many blues on knocking down the wall to the Zirconium
Rotor, toss the yellows over the black wall (that you've probably knocked partially down).
Then you can grab them later when the Rotor and Seat are on their way back, and blow up the wall.
It's still risky, but perhaps less so, and certainly earlier in the day, and on a day
where time pressures should be less severe.